Sunday, January 27, 2013

Just Spotted the Lizard Gradient

OPI Just Spotted the Lizard is one of my many, many, oh so many untrieds.  I put it on not really having a plan, but knowing I wanted to do something with it besides leave it plain.  I decided to try out another gradient, since I could use the practice, and then stamped a simple Bundle Monster design over the whole thing.
 

For the gradient, I sponged on Finger Paints Black Expressionalism, then added some top coat to smooth everything out.  The stamp is from Bundle Monster plate BM-316, using Konad Special Polish in black, then some more top coat.  I wanted something simple, that would fade into the black tips and I didn't want to cover too much of Just Spotted the Lizard with the design.


Short post today, but there's not much else to say.  This was a super simple design to do but it also turned out to be one of my recent favorites.  And Just Spotted the Lizard is pretty kick ass to begin with.  Might have to grab myself a back up of this one if I ever run across it again.

Monday, January 14, 2013

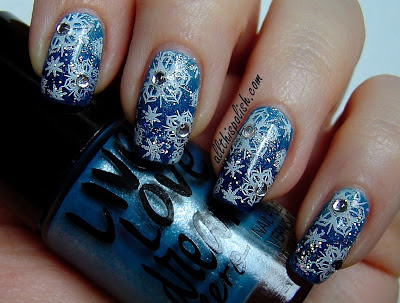
Blue Gradient Snowflakes

Right before Christmas, my friend Kelly from work bought me this little polish set she found at Aeropostale.  She told me, "I don't know if the polish is any good, but I saw the glitter and rhinestones and had to buy it for you."  As soon as I opened it, I knew what kind of design I was going to do to use all 4 pieces in the set.


The set came with two polishes, a dark blue shade and a light blue shade (no names on them), and it also came with two little pots.  One pot was filled with loose glitter and the other contained small rhinestones.

photo courtesy of aeropostale.com

I started with two coats of the light blue polish and then sponged on the dark blue to create a gradient.  The gradient ended up being a bit more subtle than I had expected, but that was due to the light blue polish drying a lot darker than it looked in the bottle.  I still like the way it came out though.  Then using Bundle Monster plate BM-323 and Konad Special Polish in white, I stamped on the snowflakes. To apply the glitter and rhinestones, I worked on one nail at a time.  I applied one coat of clear polish and dipped a fan brush in the glitter and lightly sprinkled the glitter over the clear polish.  I dabbed on a dot of clear polish in the middle of the two largest snowflakes and, using an orange stick, applied two rhinestones.  Then repeated the process on each nail.  The glitter was a little rough, so I applied one coat of Gelous before applying Seche Vite.


I had originally planned to stamp the pattern in the opposite direction but didn't realize until after my entire left hand was done that I had reversed it.  So I decided to turn it around for my right hand.  I honestly couldn't decide which way I liked it better though.


The Aeropostale polish, by the way, was pretty good.  It applied really well and only took a couple coats to be opaque.  This manicure lasted a full week.  I was pleasantly surprised.

Wednesday, January 2, 2013

New Year's Nails

So, I don't really celebrate New Year's.  I mean, I do, I guess.  But I don't get all jazzed up and go out on the town in a glittery dress and high heels.  That's just not me.  But...there should be a little glitter on New Year's, right?  So it might as well be on my nails.


This is the manicure that I wore on New Year's Eve.  It's not exactly the Times Square Ball but that was sort of my inspiration for this look.  The bulk of the glitter in China Glaze Ray-Diant has a kind of green-gold-silver look to it and reminds me of the metal framing of the Times Square Ball.  It's mixed with a bunch of glitter in all different colors, which reminds me of all the different colors and patterns the ball is able to display once the lights are turned on.  The framing on the actual Times Square Ball is a triangle pattern but a diamond pattern was as close as I could get after sorting through all my different stamping plates.  This pattern is from Bundle Monster plate BM-310.


I started out with two thin coats of Orly Dazzle as a base for two thin coats of Ray-Diant.  The first time I wore Ray-Diant, it chipped like a son-of-a-bitch the very next day.  I was not very pleased.  I decided this time to try laying it over a solid color instead of using as many coats of just the glitter to get it opaque.  I had just done this a little earlier with OPI's Spark De Triomphe, which is about the same consistency as Ray-Diant.  That manicure lasted 4 days, zero chips and I could have worn it longer except I took it off to do these nails instead for New Year's.


The glitter was a bit bumpy so I decided to top coat before stamping to try and get a smoother surface to work on.  I applied one coat of Gelous and then one coat of Seche Vite.  I'm not entirely sure it makes much of a difference but sometimes when I stamp on top of a rough glitter, the bumps in the glitter can show through the stamping.  So better to just add a little top coat now just in case than be mad later that I didn't try it.  The pattern from BM-310 is stamped using Konad Special Polish in black.


After stamping, I finished everything off with one more coat of Gelous and a coat of Seche Vite.  I did the stamping on Monday but I've actually had the glitter on since Sunday and still have no chips.  So I think using less coats of glitter over a similar base color was the way to go.  I'll be sure to try it anytime I wear any of the other glitters from the China Glaze Prismatic collection.  So that was my bling for New Year's.  I hope everyone had a great night Monday ringing in 2013.  Happy New Year!

LinkWithin

Related Posts Plugin for WordPress, Blogger...